Luminaire fields can be positioned either by selecting the Insert Luminaire Field option in The Guide or the Luminaire Arrangement Wizard → Field Arrangement option. If you select a room and then perform a rightclick, the context menu for that room opens. Here you can also select the Insert → Field Arrangement option. The Wizard sequentially queries all important parameters that must be entered.
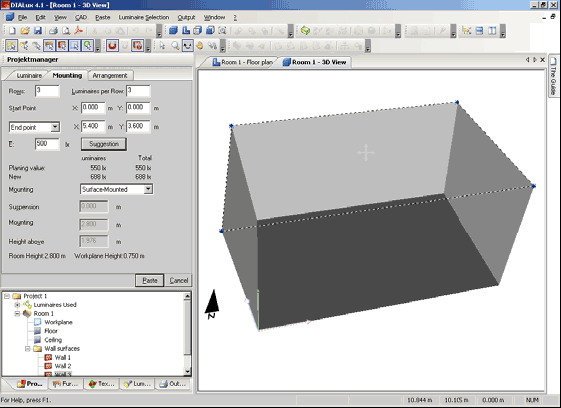
If you use one of the options with which the luminaire field is entered manually, the Inspector displays, in addition to the luminaire field, a Paste and a Cancel button.
Fig. 140 Insert luminaire fields without wizard
Until you click Paste, only the rubber band indicating the field arrangement is visible. You can modify all parameters in the Property Pages before or after inserting the field.
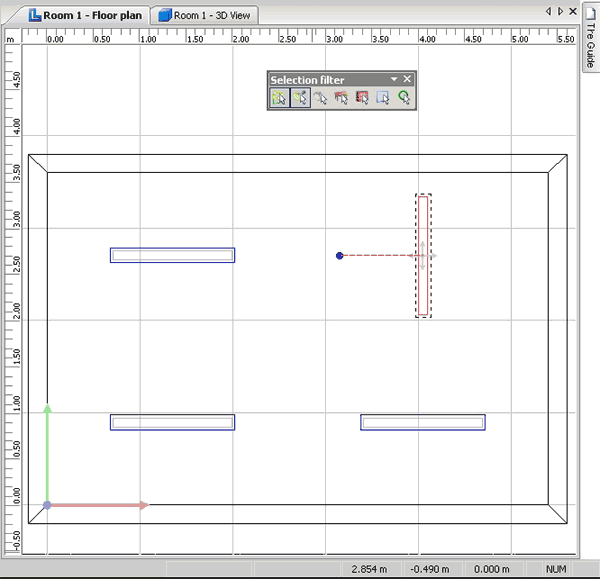
To edit a luminaire field, select it in the tree or in the CAD view. If you click on a luminaire in the field, all luminaires in the field are selected by default. If you wish to edit individual luminaires, you first have to change the selection filter.
The following filters can be selected (from left):
• Allow or restrict the selection of luminaire arrangements
• Allow or restrict the selection of individual luminaires within an arrangement
• Allow or restrict the selection of rotatable luminaire parts
• Allow or restrict the selection of furniture
• Allow or restrict the selection of surfaces
• Allow or restrict the selection of windows, doors, calculation surfaces
• Allow or restrict the selection of calculation points
Fig. 141 Manipulating a luminaire within an arrangement
The figure above illustrates how individual luminaires within a field arrangement can be modified. The selection filter allows the selection of individual luminaires. The luminaire position is unchanged. This option, for example, can be useful when directing individual spotlights in a luminaire arrangement towards furniture pieces.
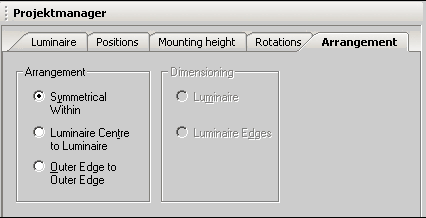
In the Inspector the luminaire properties can be changed. Here it is possible to select the arrangement type and the dimensioning type of luminaire fields.
Fig. 142 Selecting the arrangement type of a luminaire field
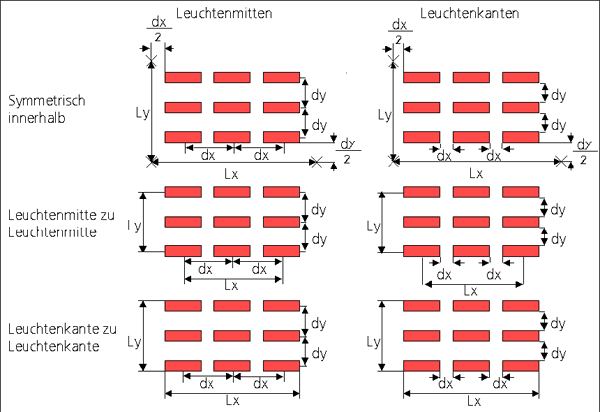
The selected arrangement type, as well as the dimensioning, influences the field properties.
Fig. 143 Effect of arrangement type and dimensioning type on the luminaire field dimensions
The arrangement type is also taken into account when the luminaire fields are edited via CAD.
Fig. 144 Luminaire field insert frames depending on the arrangement type
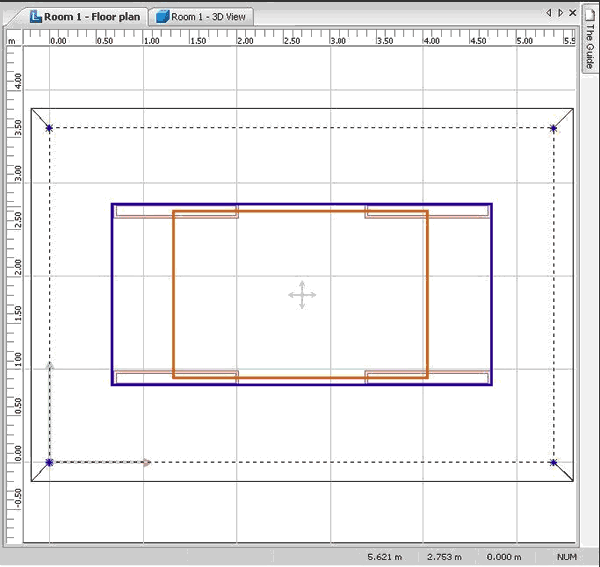
In the CAD ground plan view, three possible edit or insert frames for the luminaire field are shown. When the Symmetrical Within arrangement type is selected, the outer blue broken line appears. The frame in the middle appears when Outer Edge to Outer Edge and the innermost red frame correspondingly appears with the Luminaire Centre to Luminaire Centre selection. The dimensioning of the luminaires and of the start and end point of the field correspondingly changes. You can change the extent of the luminaire field via the mouse. To do this, right-click on the field (in the tree or in the CAD). By pulling on a line or on a corner coordinate, you can change the extent, just like you can do with the furniture. Please note that the amount and, of course, the size of the luminaires remain the same.
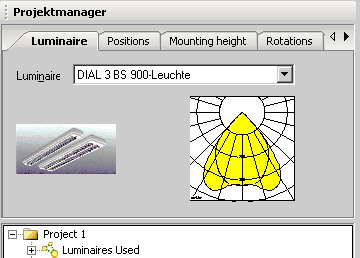
Fig. 145 Luminaires used in the arrangement
The luminaires in an arrangement can also be manipulated subsequently. As you can see in the illustration above, the luminaires and the lamps used in the field can be modified without having to delete the field.
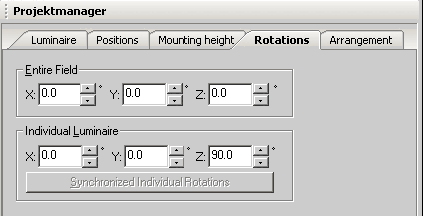
Fig. 146 Rotating the arrangement and the luminaires
Both the rotation of the entire field as well as the rotation of the luminaires within the field can be modified numerically or graphically. To rotate a single luminaire within a field, it must be selected individually. Additionally there is the possibility to synchronize individual rotations.
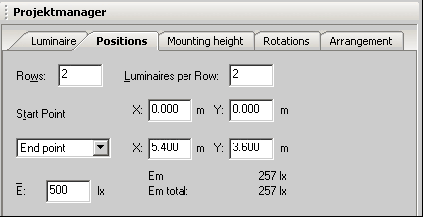
Fig. 147 Luminaire field position
The position of a luminaire field can also be modified numerically or graphically.
New features and increments
Changes in existing functionality
Installation
Installation after Internet Download
Installation from CD
Online Menu
Online Update
Manage Newsletter subscription
Wishes and Feedback / Send problem report
Install Luminaire Data
About PlugIns
About Online Catalogues
Lamp PlugIns
DIALux directories
Background information
Furniture, textures, my database
Projects and raytracing files
Program files, support
Common used program files (DIALux, PlugIns)
DIALux Light
Working with Wizards
The DIALux User Interface
The CAD Window
The Project manager
The Luminaire Selection
The User Database
Insert Luminaire Files into DIALux
Lamp PlugIns
The Furniture Tree
The Colours Tree (since version 4.3, formerly Texture Tree)
The Output Tree
The Guide
The Inspector
Edit Mode
Optimise Personal Settings
General Options
Direct3D as an alternative to OpenGL
Create a New Project
Open a new project
Project information in the file open dialog
Edit Rooms
Edit Room Geometry
Edit Room Data
An easy method for determining maintenance factor
Extended method for determining maintenance factor
Modify Properties of Individual Walls
Insert Room Elements
Modify a Room with Room Elements
Vault and half vault
Insert via Property Page
Insert Furniture
Insert Furniture
Insert via Property Page
Create Furniture
Import Furniture Files
Extrusion Volumes
Subtraction of Objects
Selecting Single Surfaces
Windows and Doors
Decoration Objects
Insert Decoration Objects
Calculate with Decoration Objects
Insert Textures
Insert via Drag & Drop
Edit Placed Textures
Delete Textures
Import Textures into the Texture Tree
Edit Room Geometry with DWG or DXF-File
Duplicate (Copy Rooms/Scenes/Streets)
Duplicate an Existing Room
Insert and Edit Luminaires and Luminaire Arrangements
Online Catalogues
Individual Luminaires
Aligning Luminaires
Inserting Luminaire Fields
Inserting Luminaire Lines
Aligning Lights
Inserting Luminaire Circles
Separating Luminaire Arrangements
Modify the position of a Luminaire
Luminaires with articulated joints
Unrestricted lighting arrangements
Aligning luminaire arrangements
Calculation of luminaire geometry included
Illumination strategies
Insertion of luminaries with „direct planar lighting”
Insertion of luminaries with „vertical planar lighting”
Coloured light
Background information
Lamp spectrum / Light colours
Colour filters
Coaction of spectral distribution of the light source and colour filter
Light colours in the ray tracing
White balance
Light Scenes and Control Groups
Definition
Requirements
Generate a project with light scenes and control groups
Modify light scenes and control groups
Export of light scenes
Emergency lighting
Global
Escape route lighting
Open area lighting (anti panic)
High risk task area lighting
Luminaires with emergency lights
Emergency lighting data sheet
Daylight calculation in DIALux
Basics
Sky types in DIALux
Light Scenes
Daylight calculation
Obstruction
Sun and shadow visualisation
Settings in the calculation dialogue
Working in the 3D View
Setup the 3D View
Check Calculation Values in the 3D View
Save 3D View
Presentation of false colour rendering
Working in Various Views
Save 3D CAD views
Wireframe Model
Editing Inserted Objects
Moving Objects
Using any surface as a working surface
Moving and Rotating Objects without Pick Grid
Scale or rotate
Rotating Objects
Scaling Objects
Combining and Saving Objects
Moving the Coordinate Origin of an Object
Resetting the rotation of the origin
Editing Object Surfaces
Arrangement aids
Measurement of distances
Working with the snap grid
Automatic help lines
Helping areas defined in the ruler
Working with help lines
Simple help lines
Poly help lines
Spline help line
Circular help line
Help grids
Copy and paste with CTRL+C, CTRL+V and CTRL+H
Copy Along a Line
Align and distribute
Centre objects in the room
Calculation Surfaces and other Calculation Objects
Calculation Surfaces
Calculation surfaces for different types of illuminance
Penetration
Task Areas
Calculation Points
UGR Calculation
Insert UGR Calculation Point and UGR Calculation Area
Adjust Viewing Direction of UGR Observer and UGR Area
Exterior Lighting
Exterior Scenes
Ground Elements
Floodlight Illumination
Lighting Design according to prEN12464 Part 2 / EN8995-2
Glare Rating
Obtrusive Light / ULR Calculation
Obtrusive Light / Luminous Intensity Calculation Point
Street Valuation Fields in Exterior Scenes
Road lighting
Standard Streets
Quick Street Planning Wizard
Wizard Optimised Street Light Arrangement
Street Planning without Wizard
Illumination Conditions Wizard
Illumination Class Wizard
Street Illumination
Luminance Calculation according to DIN 5044
Global Output Settings
User Data and Project Data
Global Settings
Output
Viewing Calculation Results
Limit Result Output
Output Settings
New Output in DIALux
Luminaire Data Sheet
Luminance Diagram
Tabular Presentation of Photometric Data of Luminaires
Tabular Presentation of Exterior Scenes
Creating User-Defined Standard Output
Save Output as PDF-File
Export Output Graphics, tables, text and graphic
DWG and DXF Import and Export
DWG / DXF-Import
Basic DWG / DXF Settings and Layer Selection
Edit a Room based on the DWG / DXF-Ground Plan
Working with the DWG / DXF Background in the 3D View
DWG / DXF-Export
Energy Performance of Buildings
Background information
Why energy evaluation in DIALux?
Structure of an energy evaluation project
Energy evaluation rooms with links to DIALux rooms and without
Working on parameters
Calculation and results
Documentation of energy evaluation results
Making videos in DIALux
Raytracer
Background
POV-Ray Settings within DIALux
Photo Realistic Images with Raytracing
Basic Settings
Quick preferences
Image preferences
Indirect calculation
Brightness preferences
Raytracing-Options for Surfaces
3-D Standard View for Raytracing
Starting POV-Ray
Start of the adapted POV-Ray Version
Smoothing edges
Picture ratio
Camera
Animation
Animation with Keyframes
Translation animation
Colour
Further functions of POV-Ray
Appendix A Keyboard Short Cuts